Showing posts with label bottlecap. Show all posts

Sunday, June 1, 2014

Bottle cap crafts

I have finally got through most of this project! It took me a little over a week of trying different products. Once I figured out which product worked most of the time was just waiting for it to dry. This is a long one with lots of pictures to hang in there with me!

I also wanted to do this project completely with things I had in my craft room. The only thing I will have to buy are the magnets to put on the back!

I started out with the bottle caps that a friend helped me save and those that I had saved. It turned out I had about 56 of them and only lost two to a product that didn't work! Not bad huh?

If you want these to be pendants for necklaces you will have to drill a hole for your eye pin. The ones you buy at the store may already have these done for you. 

After you have collected your bottle caps or bought some at the craft store you will need to sand them to help the paint stick. 


After they are sanded you can either spray paint or use acrylic paints. I used acrylic paints as that is what I had.


You will need to seal the paint so that it doesn't peel off. Again, you can buy a spray sealent or like I did you can Mod Podge. Let dry completely! I can't stress that one enough!

After it is dry you will have to cut papers to put inside the caps as your backgrounds. Again, this would have been a lot easier with a circle punch, but I'm cheap! By the time I was done with 56 of them I was pretty good at it! 

Note: today I found caps and a punch for half price at Hobby Lobby!


Then fill with embellishments!


Sorry the next pic is a little blurry.


This is also when you will need to add your eye pin or eye screw. Make sure the hole you made is filled or your resin will leak out. 

After you have filled as many as you can  (I recommend doing large lots at a time as I did above), fill with the resin/glue of your choice. Here are the ones I tried.


I recommend the Easy Cast, you will see why! 

Here I used the Dimensional Mod Podge.
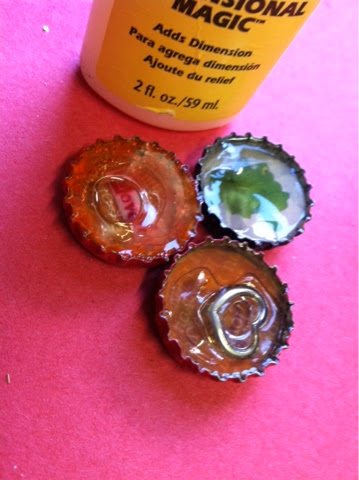


As you can see it didn't work so well and is expensive when you are making as many as I did.  Luckily, I was able to pull these out and reuse the caps!

I tried the Mod Podge and it never dried, again I was able to pull them out and reuse. 

Sadly, the two below I lost to Gorilla Epoxy. It got very hot once inside the metal caps and was full of bubbles. I was not able to save these. I had to open all the windows of the craft room as well.  I will still make them into magnets and use on our board in the house.


Easy Cast was the winner as it has a degassing agent in it.  This means that within the first hour all of the bubbles will be gone! The only downfall to this product is that it takes 72 hours to dry.  I can tell you that they mean this! After 24 it is still tacky.  After 48 the top will still leave marks or finger prints. 72 hours it is fully dry and you are able to touch it.  The other perk is that it is low odor and I didn't need to worry about using it in my craft room. 

Here is the last batch that I just filled today! I would have kept going but I ran out of caps and things to put in them!


Magnets!  If you use E600 please use it in a well ventilated area!


I really had a lot of fun making these and plan to make a lot more! I will try to get individual pictures on te Facebook page as soon as everything is dry and the magnets are attatched!


Thursday, February 27, 2014

Nope, not Friday yet...

Seriously, this week is taking way to long to get through.  Contractors, babies, school reports oh my!  Let's just say this week needs to end soon.  This week has been one of those weeks where I have to decide if I am going to keep up the Facebook page, Pinterest and this blog or if I give up due to lack of interest.  Maybe I need to market more?  I need to focus more on my own craft projects as well.  Yep, I hit a wall, a slump, a rut in the road.  So I jumped!  I am still hanging in the air over that wall or rut and waiting to see if I make the leap (or slam into the wall) or if I fall and hit hard.  So hang on for the ride and if you are out there give me a shout, you might be my safety net if I fall or the breeze that pushes me just that much further!

Enough with the heavy!  It is Paper Thursday!  I am here to help you find your next project or spark ideas of your own.  Today's idea came from this morning's school rush.  My kids have matching backpacks.  They are constantly getting them mixed up and in the morning rush have had to switch bags on the bus last minute.  So I was trying to think of ways to help them identify which bag belongs to which kid.  No they wont give them up and get different bags!  They are very proud to be military brats and one of the few Army kids in an Air Force majority school and carry Army National Guard backpacks!  They have gotten a great welcome from the other Air Force kids, even with my oldest having long hair and he is definitely in the minority there!  The girls are crushing and his girlfriend wont let him cut it (he's going to be 13 in a week) *sigh*...

So what better way to identify a military back pack than with dog tags!  Infarrantly Creative has a great project for just that! Click on the picture for a link to their website!  They own the picture and the project ideas!

backpack tags (4)

HERE is the link to punchplaceplus.com where she found the dog tags! They also have color ones that are like tags you get for your bag when traveling (another great place to use these dog tags;).  All you have to do is print your dog tag and slip it in. Another great place to find them is Amazon!

One of the pins that is most often pinned from my personal Pinterest page is bottle cap projects.  I use the metal ones a lot in my miniatures to make pies and I use pop bottle caps (plastic ones) to make cakes!  So I wondered if they could be used for this too!  So why not use those bottle caps I have saved for this?   This Workman Life did just that!  See their picture below to see these great projects!

http://thisworkmanlife.blogspot.com/2012/04/diy-bottle-cap-badge-clips.html
Go HERE to find your badge clips!

Let me know if you think of anything else.  We are hoping to tackle this project this weekend!

Quote of the Day


Love it! Happy Veterans Day and happy birthday to my little army brat!!